Quick Dual Timezone Clock Design

Posted by mitch on January 17, 2012
projects

I have long wanted a dual timezone clock for my desk but I never found one that I liked. Most of the multi-timezone clocks on the market are for 3 or 4 timezones and are gaudy analog displays or ultra utilitarian digital displays. Why not build one using an Arduino board as the base? This would enable a number of integration opportunities with Internet services.

I’m planning on having two screens on the clock, each of them 128×64 pixel monochrome displays. Driving one of these screens requires a significant number of I/O lines, so this design will benefit from using an Arduino Mega board, though I haven’t yet confirmed that the Mega has enough lines without some type of mux.

The model above shows an approximate mockup that I threw together while flying earlier today. The clock is about a 2×2.5×7″ rectangular prism with a triangular subtraction so that the screens can be tilted. I suspect the length can be shrunk to 6″ or less; there’s a lot of empty space in the above model. The Ethernet RJ45 and power jacks are moved from the Arduino boards to a separate board so that the main boards can be mounted vertically but the wires are still on the back of the clock.

I have a few software features in mind:

  1. NTP sync on power-on and thereafter syncing once per day. This has the obvious advantage of never having to set the clock and also enables using a cheaper real-time clock chip with a few seconds of drift per day.
  2. The above requires Ethernet. The Arduino Ethernet shield gets the job done.
  3. A simple web interface to configure the timezones and perhaps zip codes so that some weather information can be displayed for each location.
  4. A button on the back of the clock to show the DHCP-collected IP address.
  5. Perhaps a bit of integration with a calendar feed to show upcoming events on the calendar. This will likely require some kind of middleware that the clock communicates with. I am not sure I will take it this far.

PoE would be a cool addition but I’m not sure I want to mess with it for this project.

I’ll post again when I have more than vaporware. I ordered the LCD screens this weekend.

Tags:

Copyrights, Trademarks, Patents, and Trade Secrets

Posted by mitch on January 10, 2012
business

I was reading a forum where people were talking about the new Swivl and saw someone complaining about the name “Swivl” being too weak for a “copyright”. I’ve seen a lot of confusion about what the differences are between a copyright and a trademark, a copyright and a patent, and a patent and a trade secret. Briefly,

A copyright protects a work that is authored. In the case of a technology product, this includes the source code, the documentation, and also marketing materials such as the web site or datasheets.

A trademark protects a word or other way to identify a brand. In the case of a technology product, this includes the name of the company, the name of the product, and any logos or slogans tied to the brand identity. Trademarks may be claimed but unregistered (TM) or registered (R). Trademarks apply to a specific category of products or services, which is why it’s fine that we have Delta Airlines and Delta Faucets.

A patent protects inventions or discoveries. In the case of a technology product, this can be pretty broad—an algorithm used by the software1, a way to build a product, or some other invented technique.

A trade secret is something that is not revealed and kept intentionally secret because it is something of value. Companies must mark any information as confidential as part of reasonable efforts to keep such information secret. The classic example of this is the Coca-Cola formula. There is no protection of a trade secret if someone else can clean-room reverse engineer the secret.

There is a balance between patents and trade secrets; a patent provides broad protection but the science behind the invention must be disclosed in return for that protection—and the patent does eventually expire.

By no means are the above descriptions detailed, exhaustive, or legal advice, but they are brief and understandable. For more information, visit these pages:

Many thanks my friends and colleagues who reviewed this post prior to publishing.

1 When embodied in something real. And there’s the argument about whether or not software is real. Anyway, the goal of this post isn’t to debate this point.

Tags: , , , ,

Products I Want But Haven’t Found

Posted by mitch on January 09, 2012
productivity

Please feel free to “borrow” the ideas below and bring them to market. I will happily beta test!

1. Built-in USB wall charger. (Edit 11-Feb-2012: See my follow-up post.) A 1-gang USB wall charger that installs in a standard electrical box, available in white with a Decora faceplace. I want 6 USB ports and zero outlets. Maybe also a version with 1 outlet and 3 USB ports. I would buy a lot of these, especially if they had a bit of surge suppression in them. I know about the FastMac USB plate and I have 2 or 3 of them sitting in a box, but they are ugly and don’t provide enough ports. I am using a 4-port USB wall charger in the interim. This particular model has a cheaply machined AC plug, so it often falls out of the wall socket, especially in hotels with often-used sockets.

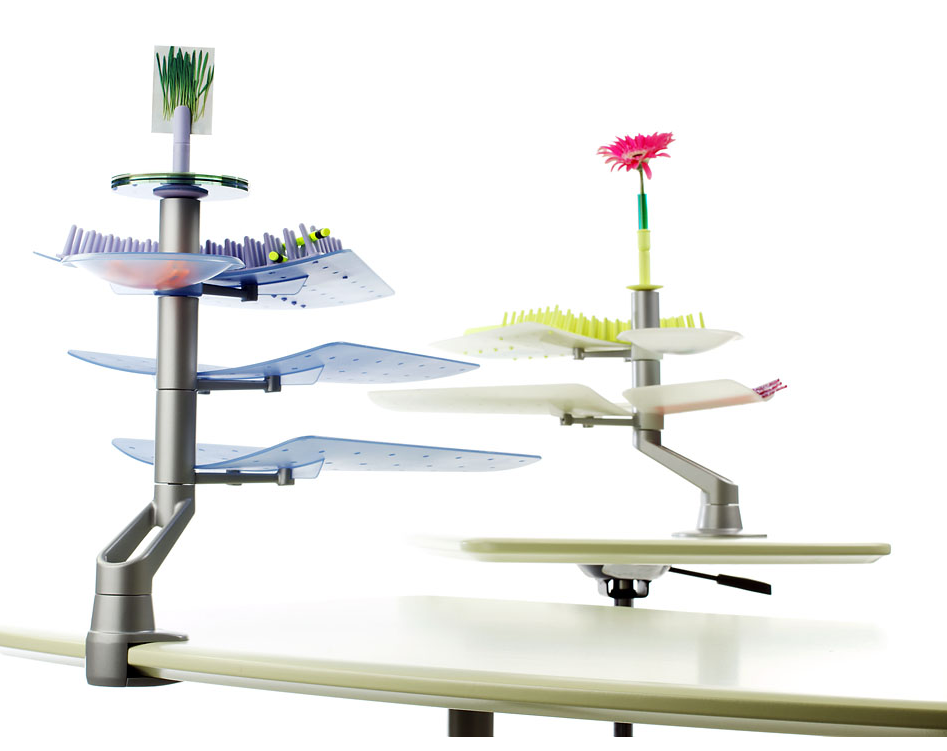
2. Shaun Fynn’s paper tray system (pictured below; sorry for the poor link, but his site is Flash). Apparently this is no longer on the market. What I really love is the under-stated nature of the trays (no walls), the “rubber garden” for holding small items like pens, zero desktop footprint, and the arms for moving the trays around (so they can be pulled forward to retrieve or triage, and pushed back out of the way).

3. A way to drive 3×30″ displays from a 15″ MacBook Pro. Village Tronic is working on a Thunderbolt enclosure. Hopefully it comes out, doesn’t suck, and will solve this problem. I think SSDs, a Thunderbolt RAID, and something like this might let me stop buying desktop computers.

There’s probably more, but these came to mind this morning.

Nest Thermostat Installation

Posted by mitch on December 31, 2011
home

I finally got around to installing my Nest Thermostat. Even though I had pre-ordered it the day it was announced (Oct 25th) and it was delivered to my home around November 30th, I hadn’t had a week when I knew I’d be home long enough to deal with installing and support. I didn’t want to install a new thermostat during winter and then go on a trip for a week, leaving my girlfriend to deal with it if there were any problems. Somehow I didn’t think she’d find much humor in that, though I could be mistaken.

In any event, installation was easy. I was surprised to find out how much my electrician destroyed the wall when he put the old one in, so patching and painting the wall will prove to be the hardest part. I’m a bit annoyed because this was a brand new wall built in the 2008 remodel–the wall was about 3 days old when the electrician made a mess. I was able to re-use one of the screws from my old thermostat mount (a basic 7-day programmable Honeywell I bought at Home Depot). If you have such a thermostat, you might find yourself painting or repairing the wall because the Nest is smaller and a different shape:

The Nest comes with some tools (screwdrivers) to help the install but I didn’t use them because I forgot they were in the box. There are also some mounting plates if you don’t feel like fixing the wall or if you need to mount the thermostat to a 2-gang electrical box.

My house has only forced air central heating, so it was pretty simple to install–just two wires to R and W. One thing I had to research is that my old thermostat had a jumper from Rc to R; if you have such a jumper as well, rest assured Nest electronically provides this jumper internally. The Nest web site has some very good instructions and a nice compatibility checker based on the wires going into your old thermostat.

Once the thermostat was wired in and I turned the power to the furnace back on, the Nest booted up and I was able to join my WiFi network without issues. The Nest downloaded a software update and I set a few basic configuration parameters–zip code, a few questions about the heating system, and the minimal temperature to drop to when no one is home was the primary. From there, setting the temperature is as simple as turning the dial just like you would on an “old style” thermostat.

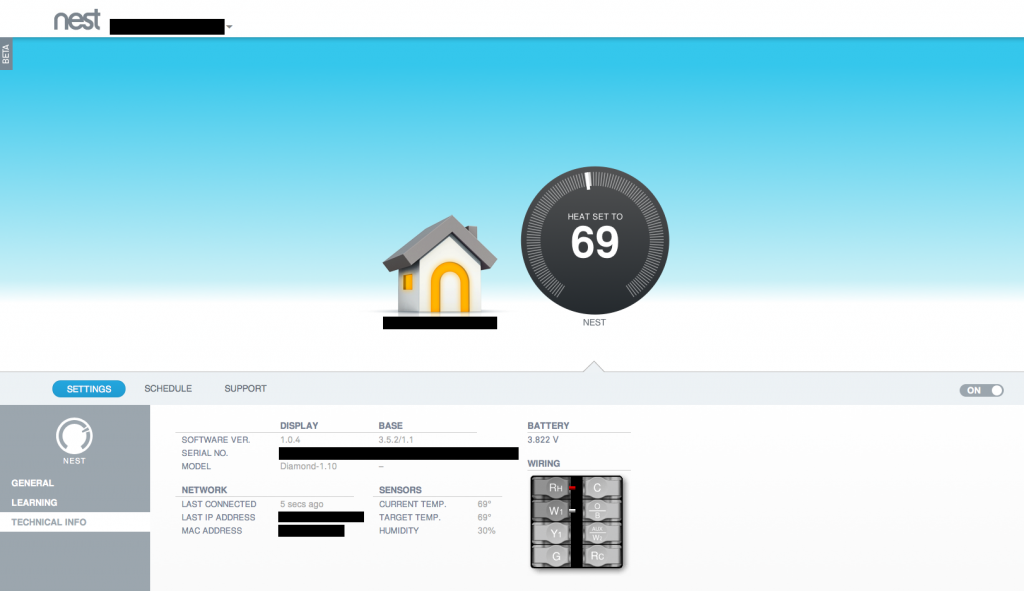
I found it a bit odd the “configuration wizard” doesn’t have you set-up a Nest.com account. I had to dig into the settings menu to do that. Once you’ve done that, you can login to the Nest through the Nest.com web site and see the temperature and humidity from anywhere. You can also change the temperature, see the learning schedule, diagnostic information, and so on. It looks like the web site has support for installing the Nest in multiple houses, too. The remote access feature is great and I suspect (and hope) Nest intends to build more home automation products to plug into this framework.

Nest access from a web browser (click for larger)

We have a Mac Mini that we use for most of our TV watching in the living room (with NetFlix, Amazon, and iTunes–we don’t have cable TV service and haven’t had it for 4 years). It would be nice to have a GeekTool widget showing the Nest status on the desktop on the living room TV. I’m not sure if this is something that can work with GeekTool out of the box or if Nest will provide APIs or if it can be scripted with Automator, Safari and GeekTool, but I might play with this later…

One negative about the Nest relates to where it’s mounted in my house. The Nest is configured to turn the screen on when it “sees” you approach it (so that you can see the temperature settings). However, I have some trim to the left of the Nest that might interfere with how it sees a person approaching from the usual direction (from the left). When I approach from the right it lights up perfectly. Perhaps this is something that I will get used to or can be addressed in software later.

Construction of the Nest is pretty solid, although I feel the logo shouldn’t be on the face. The prominence of the logo cheapens the Nest appearance quite a bit. Yes, it’s “good” marketing, but many premium home products speak for themselves in their look. The Eames lounge chair doesn’t have a prominent Eames logo on it. Nor do any of my high-end lamps. Nor does the iPhone. Yes, there are logos on those products, but it’s not front-and-center like it is with the Nest.

You can see more photos of the Nest here. I will report back in a few weeks or months after living with the Nest for a while.

Update Jan 1, 2012: Several people have asked if I think the Nest is a good value at $250. The primary selling point of the Nest is its learning ability. I don’t have any feedback on that yet. However, cheap programmable thermostats at Home Depot or similar stores will run you about $40-$100 depending on what you buy. If you go higher end, you can easily spend $300-$400 on a thermostat with WiFi from Honeywell at Amazon and it’s still a boring white box. Should a wall have an exciting thermostat? I often think of what the Miller brothers said when they were designing Myst on the challenge of creating interesting environments without making them too fancy, “you’re either walking through a room or you’re stopping and staring at everything.” For me, the look of the Nest alone justifies the price. It has a more modern and refined feel than a piece of white plastic. The aluminum sides mirror the wall surface it is placed on, which helps it blend in nicely with the background. But ignoring design and comparing the WiFi/remote access feature alone, I think the Nest is competitively priced.

Update Jan 9, 2012: All the other blogs I’ve seen on Nest installs show a lot of folks are using the included paintable plates that Nest includes to reduce patching the wall. But I felt these plates detract quite a bit from the simple look of the Nest, so I invested in the time of fixing up the wall and painting. I am really happy with the result:

Update Feb 22, 2012: I wrote a post on Nest ROI and the general lack of contrast vs my old thermostat.

Tags: ,

Kitchen Remodel Contemplations

Posted by mitch on December 23, 2011
home

Recently I have been spending some time planning a kitchen remodel. The kitchen remodel is something that we have been expecting to do since before buying the house. Frankly, there’s just no other way to say it–the kitchen sucks. It’s ugly, the cabinets are hugely inefficient, there are a mere 12 sq ft of built-in counter space, and the layout is ridiculous. Who puts a dishwasher in the corner? Anyone shorter than 6’0″ can’t unload the dishwasher and put dishes into the cabinets above without staging the dishes onto the counter first. The inefficient design is a bit weird because the room is quite large–it’s roughly 14 x 16 ft, with everything on one wall in the back.

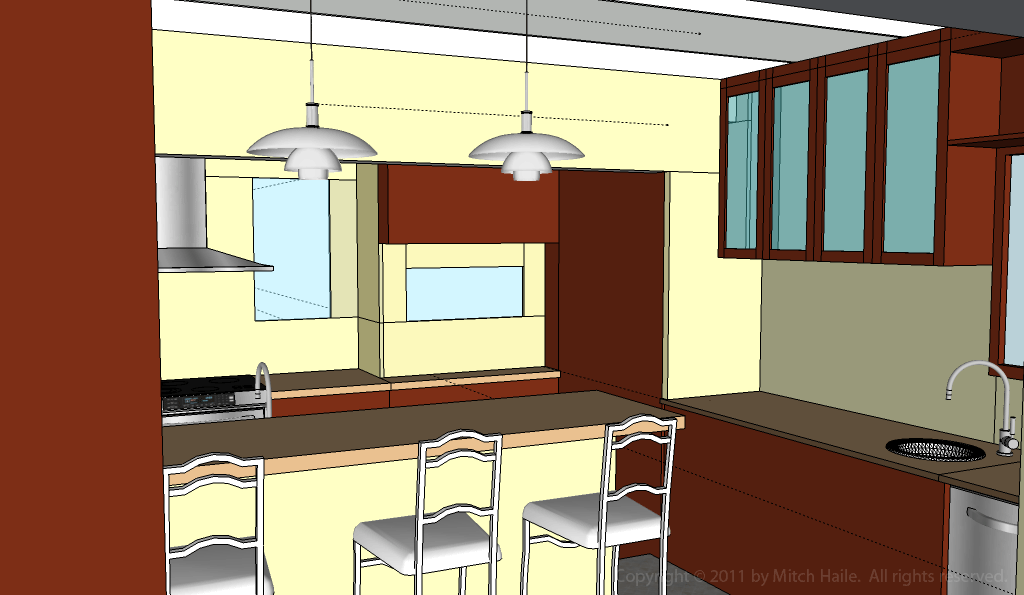
Depending on what else is going on, I plan to start construction in either late 2012 or early 2013, so I have had plenty of time to look at kitchen design books, web sites, and make a lot of models in SketchUp. I’ve also spent some time thinking about the kitchen like I would a product. How will the kitchen be used? What are the use cases? What’s the workflow? Here are some of the things I’ve come up with to consider for how we use our kitchen:

1. Food preparation. Where do ingredients come from, both from the fridge and cabinets? What about spices, which are often stored closer to the stove than regular pantry items? If the user needs a mixing bowl, a serving dish, a baking dish, where do those come from? Is there room for ingredient preparation from the fridge and queuing for cooking? Where does trash go?

2. Staging food to the dining room. Is there a logical place to queue prepared dishes to leave the kitchen and be moved to the dining room? Does that space compete with other tasks?

3. Loading the dishwasher. Is there sufficient counter space that is naturally a target for putting dishes in queue for the dishwasher? Is that counter space likely to compete for other tasks, such as a dish drainer or preparation? How is this space positioned against the dining room or eat-in area? Is it natural for one person to queue dirty dishes while another person loads the dishwasher? Where do food scraps go? Where do dishes with leftovers go to queue for putting into the fridge?

4. Unloading the dishwasher. Where are the cabinets for pots and pans, plates and glasses, where are the drawers for flatware and other utensils? How does the design enable the user to move dishes from the dishwasher to those destinations with minimal work (number of steps to take, reaching in awkward ways, etc.)? For our volume of dishes, does there exist sufficient space in those destinations to hold the amount of dishes we want to keep in the kitchen? Is there a place for a dish drainer that doesn’t compete with other tasks?

5. Getting a drink. How efficient is it to enter the kitchen, get a glass, get ice, and a Coke? What about making coffee? Mixing a manhattan? Where are the beverage supplies and glassware? How does the drink preparation flow co-exist or interfere with cooking flow?

6. Number of users. Knowing how we cook as a couple, is there space for each person’s tasks and access to tools and ingredients with minimal cross-over with the other’s tasks? Can two people prepare food and still interact? What if there is just one person preparing food and the other person wants to hang out in the kitchen? Can this be accomplished without physical overlap of space?

When we bought the house, our realtor advised living with the crappy kitchen for a while to get a better understanding of its limitations and give careful consideration to what’s really important in a kitchen. I thought this was pretty strange advice, but since there was so much other remodeling going on, I was happy to go with it. This turned out to be amazing advice. I never would have articulated much of the above without having to consider what makes the current kitchen a disaster.

If you think I’ve missed something in the above ideas, please feel free to tell me. I am not a professional architect of physical spaces, just software.

Tags:

MacBook Pro 15″ with Upgrades

Posted by mitch on December 20, 2011
hardware

As part of my change in laptops, I bought a MacBook Pro 15″. As I mentioned in my last post, I intend to start traveling with two laptops; the 11″ Air for working in tight spaces, like airplanes, and the 15″ for when I have a table or desk to work at. Not having a more powerful machine with plenty of RAM on the road had been limiting the kinds of tasks I could work on.

So I bought the 15″ matte MacBook Pro with the high res screen and 1 GB VRAM. Unfortunately, when buying this screen spec at a physical Apple Store, they only have a “top of the line” model with the 2.5 GHz i7 processor and a 7200 rpm drive. However, it is easier to use my corporate discount at physical Apple Stores (my company doesn’t seem to have an EPP online store), so I bought it. By the way, the EPP discount on the MacBook Pro was 8%. I then ordered a 256 GB SSD, optical drive bay adapter bracket, and 16 GB RAM upgrade kit from OWC and installed them:

I had been under the impression that working inside a unibody MacBook Pro was a painful experience, but it’s actually quite simple. The OWC bracket kit comes with some tools but I found the screwdriver to be of dubious quality and used different drivers. All you need is a T-6 torx and a Philips #00 (or perhaps #0, I couldn’t really decide) driver. OWC has some nice videos and it really is quite easy.

The hardest part was dealing with installing Lion on the SSD. The Internet install claimed that there was an error with the SSD drive. I ended up finding the “InstallESD.dmg” from a Lion upgrade I did on my previous Air and running that from the hard disk to install Lion on the SSD.

I am very thankful to all the folks on Twitter who told me 16 GB of RAM was possible in the MacBook Pro. It is fantastic to have such a powerful machine in a laptop and I hope I can adjust to the weight change. If things go well with the MacBook Pro, I expect to swap out the 750 GB hard disk next year with another SSD.

Update March 2012: I just added a 2nd SSD to the MacBook Pro. So far so good!

Tags: ,

Flying with the MacBook Air 11″

Posted by mitch on December 16, 2011
hardware, travel

I recently bought an 11″ MacBook Air for airplane use. In 2011, I did about 44 trips, which means I was on at least one plane about 88 days this year. Those 88 days yielded 140,000 miles of travel, which works out to 1600 miles on average per day of travel. At 500 mph, that’s 3 hrs in the air on 88 days on average, or 264 hours in the air during the whole year.

During that time I concluded that the 13″ MacBook Air is just too big on most coach tray tables, and even some first class tables as well. I don’t always want to work on a plane, but when I do, not having a good laptop solution was reducing my productivity and increasing the number of tasks I would have to do after or before landing.

I don’t view the 11″ as a replacement laptop, but rather a secondary laptop. While it probably is ridiculous to carry two laptops, they have gotten a lot lighter and so far, I feel it’s worth the weight increase–the 11″ is about a pound heavier than the iPad and about the same size. I might change my mind in 100,000 miles, though.

The 11″ MacBook Air fits surprisingly well on the newer A321 first class tray tables (the ones that are about 6″ deep). I think it might have been designed for this table, in fact–the fit is just that good. I also did a leg today in 9E in coach (exit row with no right seat on a A319 aircraft) and it’s a fine fit there as well. Row 8 didn’t recline, but I still had a good inch behind the screen and could 2″ to spare with a little less comfort.

I was worried about the 1280×800 resolution. When I moved from the 2008 MacBook Air 13″ to the 2010 model, I thought the 1440×900 vs the old 1280×800 made a huge difference. But looking at the two 11″ and 13″ side-by-side, I don’t think I care about the loss of pixels, especially given the upside of reduced size.

There is a hidden cost of using two laptops if you have a desktop as well–applications like Photoshop and Office are often licensed for use on two computers, not three. So I have to buy another copy of Office, but I plan to forgo the Adobe applications.

The upside of two laptops is very handy, though. It’s nice to have two screens on the road. I was at a coffee shop Thursday morning preparing some notes for a meeting. I had a slide deck open on one screen that I was reading and creating summary slides on the other. DropBox syncing makes moving files between laptops easy, and with my MiFi, a WiFi LAN is easy to enable (DropBox will sync over a local LAN if peers are found on the LAN). Of course, there’s other ways to setup a WiFi LAN with two machines without a MiFi.

I wrote this post and some other things while on a flight from SFO to PHX. During the 400 miles from SFO down to southern California before hanging a left to Phoenix, I wrote over 1,200 words and was comfortable doing it. Even though I was sitting in first class, I would not have been nearly as comfortable doing this with the 13″ model. On my later leg, I wrote some code I had been meaning to work on for months but hadn’t had the time. I don’t think I’ve written code on a plane in years. I ended up creating perhaps 15-20 pages of content while in the air today, even though 70% of that time was in coach. Pretty good! Battery life was pretty decent too; if I had worked straight though I might have run out of gas by the end of flying, and I started around 85% on my first flight. I’d say the 11″ can barely make it across the US at the lowest screen setting with one or two small low-CPU apps open.

Is the MacBook Air 11″ a good buy? I think so. With my 6% corporate discount and CA sales tax, the laptop ended up being $1226 (I bought the middle $1199 model). It’s a heck of a lot of computer for $1226. Going back to the earlier math, I only need a billable rate of $4/hr to break even on the $1226 purchase. Fortunately, my billable rate is a little higher, so I should be in the black pretty quickly.

Tags: ,

Motion Detector Light Switches

Posted by mitch on December 03, 2011
home

I installed a Leviton ODS10-ID Decora Wall Switch Occupancy Sensor in a room in my basement with a cold-start fluorescent tube and an instant-start fluorescent tube (wired in parallel off the same switch) and it works great! I’ve tried some cheaper motion-sensing switches but they can’t control non-incandescent bulbs, especially cold-start fluorescent tubes.

There are some great properties to this switch–the angle of visibility and length of time to run the lights are configurable. The pigtails on the switch are copper, not aluminum, so you don’t need special wire nuts to wire this in properly. There’s no audible click of a relay (not to my ears anyway).

I did run into two small snags while installing this. I was installing this in a standard 2-gang steel electrical box with a GFCI outlet, which was quite tight, but I did manage to make it all fit. If you’re installing this in a cramped box, beware that the unit is quite large–as large as a GFCI–so you may find you need to install a bigger electrical box. Like many installs in steel boxes, I had to snip some of the metal support to make it fit. There’s no scoring on the metal (as there are on outlets), but aviation snips took care of this fine.

The other small issue I ran into was the plastic cover for the settings–this is a small cover on the front of the switch, between the push button at the bottom and the sensor at the top. I left it off, installed the switch into the steel face of the electrical box, and had a heck of a time getting the cover back on. I ended up using an Xacto knife to cut down a bit of the width on one side of the cover to get it back in place.

All in all, it was a great install and I’ve ordered another switch for my workshop lights.

Tags: ,

Built-in Nightlights

Posted by mitch on December 02, 2011
home

I love lights. Lamps, light fixtures, light bulbs–arranging, window-shopping, actually-shopping, experimenting with–I love lights. In two of the hallways in my house, I had a pair of nightlights plugged into outlets in the hall. I had my electrician put outlets in the halls specifically for the purpose of nightlights when re-wiring the house. However, my house cleaners kept leaving the lights on the floor, or turned off, or on a table in a different room, and so on.

I couldn’t seem to win the battle of the nightlights, so imagine my excitement when I found out about built-in nightlights. (If you’re having trouble relating, let’s just say I was pretty excited.) My local Home Depot only had these in ivory so I had to order them from the Home Depot web site to get white ones. They are made by Pass & Seymour, and unlike some of the competition, they are rated for a full 15 amps (some of the ones on Amazon appear to be rated for 6 amps??).

These are normal Decora-style sockets. You lose a socket, but you gain a nightlight that cannot be moved. There is a photocell and the light comes on and off as you would expect. The look is also very slick and smooth–much better than something hanging out of the wall. The box isn’t very deep and fits well into a standard-size electrical box, even ones with a few wires in them. The entire rear surface is a ground plate. It’s a bit weird the ground screw is at the top of the box vs the usual bottom, but any proper electrical box should have 6″ of length to work with, if it is up to code. Speaking of US electrical code, these are tamper-resistant, which conforms to the 2008 code changes.

All in all, I’m pretty happy with these. They output a good amount of light and the color temperature is in line with other LED nightlight options. But most importantly, it’s a cleaner look–I hadn’t considered it before, but my old nightlights looked cluttered. Now the walls are a little easier on the eye.

Update 11-Feb-2012: Check out my post on built-in USB charging outlets!

Tags: ,

Competitive Intelligence with Twitter, LinkedIn, etc.

Posted by mitch on November 30, 2011
business

Recently I did a quick interview about how I used Twitter at my last company. As I was answering questions, I realized there are three major activities that I used with Twitter:

  1. Promote ourselves (so that people find us)
  2. Research customer needs and identify new customers (we find people)
  3. Competitive intelligence.

The third I thought was particularly interesting as most of the blather (er, blog posts) on the web are about (1) and (2), but not (3). Of course, searching Google for “competitive intelligence twitter” has about 21,000,000 results and I didn’t have time to go through them all.

Here are some thoughts based on what I’ve done for competitive intelligence with Twitter in the past:

You may want to know what their engineers are working on and doing. Using LinkedIn, you can map companies to teams with names. Those individual profiles may have links to personal Twitter accounts or you might be able to find those people with Google and Twitter Search. Engineers talking about tools or technologies may reveal what they are working on or new areas under investigation.

Of course, LinkedIn is gold mine in and of itself—too many employees say too much in their LinkedIn profiles about what they are working on. There have been several times where I’ve asked my employees to tone down what they are saying on LinkedIn.

You might care about what the sales folks are doing. Where are they traveling? Not all sales reps are going to tweet “just landed BigCo!” but they might check-in on Foursquare at a restaurant across from BigCo’s west coast office. Using Foursquare and Google Street View and Google Maps, you can quickly reverse map who someone might be meeting with or spending their time.

I recently took a class at MIT where one of the professors was Dr. Jay Paap, a management consultant who has done a lot of work on developing competitive intelligence frameworks. One of his papers (PDF) is an excellent summary on sources of intelligence and these generally map back into the social media world (so don’t disregard this because it was published in 1995).

The flip side to all of this, of course, is that companies need to be very careful what is being posted. When I worked at Motorola 11 years ago, the company was hugely paranoid that the cleaning crew might be Nokia employees. There were weekly sweeps of the office and reports on who had unlocked computers, file cabinets, papers left out, whiteboards not erased, etc. Documents had various levels of confidentiality classification and corresponding trash cans. I haven’t worked at a company that paranoid since, but I have brought some of those policies into my own work.

What are you doing to gather or evade competitive intelligence?

Tags: , , ,