hardware

Ethernet hwaddr and EEPROM storage with Arduino

Posted by mitch on October 31, 2012
hardware, projects, software

There are lots of examples of how to use the Ethernet Wiznet chips with Arduino, whether as Ethernet shields or as Ethernet Arduinos on a single board. Unfortunately, most of these examples hard-code the hardware (MAC) address, which can make things painful if you’re building more than one device and running them on the same network.

The code snippet below is a more convenient approach. You can setup a prefix (DEADBEEF in the example below) for the hardware address and the last two bytes are set randomly on first boot. The hardware address is stored in EEPROM (7 bytes are needed, 1 for a flag indicating that the next 6 bytes are properly populated).

The bytes->String conversion below is a bit ugly but I didn’t think I wanted the overhead of sprint in this. It is probably not worth the trade off. (0x30 is ‘0’ and 0x39 is ‘9’. Adding 0x07 skips over some ASCII characters to ‘A’.)

Some serious caveats: There’s only two bytes of randomness here. You might want more. Ideally you would have a manufacturing process, but if you’re just building six devices, who cares? Clearly you would never use this approach in a production environment, but it’s easier than changing the firmware for every device in a hobby environment. You could also use a separate program to write the EEPROM hardware address and keep this “manufacturing junk” out of your main firmware. These issues aside, my main requirement is convenience: I want to be able to burn a single image onto a new board and be up and running immediately without having to remember other steps. Convenience influences repeatability.

#include <Ethernet.h>
#include <EEPROM.h>

// This is a template address; the last two bytes will be randomly
// generated on the first boot and filled in.  On later boots, the
// bytes are pulled from EEPROM.
byte NETWORK_HW_ADDRESS[] = { 0xDE, 0xAD, 0xBE, 0xEF, 0x00, 0x00};
String NETWORK_HW_ADDRESS_STRING = "ERROR_NOT_FILLED_IN";

// These are commented out so that this code will not compile
// without the reader modifying these lines.  If you are using
// EEPROM code in your program already, you need to put the
// network address somewhere that doesn't collide with existing use.
//#define EEPROM_INIT_FLAG_ADDR 0
//#define EEPROM_HWADDR_START_ADDR 1

// Call this from your setup routine (see below)
void
initEthernetHardwareAddress() {
    int eeprom_flag = EEPROM.read(EEPROM_INIT_FLAG_ADDR);  
    int i;
    Serial.print("EEPROM flag is " + String(eeprom_flag));
    
    if (eeprom_flag != 0xCC) {
        NETWORK_HW_ADDRESS[4] = random(255);
        NETWORK_HW_ADDRESS[5] = random(255);  
        
        // write it out.
        Serial.println("Writing generated hwaddr to EEPROM...");
        for (i = 0; i < 6; i++) {
            EEPROM.write(EEPROM_HWADDR_START_ADDR + i + 1,
                         NETWORK_HW_ADDRESS[i]);
        }

        EEPROM.write(EEPROM_INIT_FLAG_ADDR, 0xCC);
    } else {
        Serial.print("Reading network hwaddr from EEPROM...");
        for (i = 0; i < 6; i++) {
            NETWORK_HW_ADDRESS[i] =
                EEPROM.read(EEPROM_HWADDR_START_ADDR + i + 1);
        }        
    }
    
    char hw_string[13];
    hw_string[12] = '\0';
    for (i = 0; i < 6; i++) {
        int j = i * 2;
        
        int the_byte    = NETWORK_HW_ADDRESS[i];
        int first_part  = (the_byte & 0xf0) >> 4;
        int second_part = (the_byte & 0x0f);
        
        first_part  += 0x30;
        second_part += 0x30;
        
        if (first_part > 0x39) {
            first_part += 0x07;
        }
        
        if (second_part > 0x39) {
            second_part += 0x07;
        }
        
        hw_string[j] = first_part;
        hw_string[j + 1] = second_part;
        
    }

    NETWORK_HW_ADDRESS_STRING = String(hw_string);

    Serial.println("NETWORK_ADDR = " + NETWORK_HW_ADDRESS_STRING);
}

void
setup() {
    // first call the usual Serial.begin and so forth...

    // setup the Ethernet hwaddr before you start using networking
    initEthernetHardwareAddress();

    int dhcp_worked = Ethernet.begin(NETWORK_HW_ADDRESS);

    // ...
}

iPad (2012) vs iPad 2 and iPad 1

Posted by mitch on March 16, 2012
hardware

Summary of my thoughts so far:

  • The screen is amazing.
  • The 2012 iPad is not noticeably thicker than the iPad 2 and is still thinner than the original iPad.
  • The 2012 iPad feels heavier. It’s not technically significantly heavier, but that weight in your hand for an extended period feels heavier. It also feels like the weight is distributed differently, though I am not sure that this is true.

Some pictures:

iPad 2 (left) and new iPad on right

iPad 2, iPad (2012), iPad 1. All screens on 50% brightness.

iPad 2012 (left) and iPad 1 (right) thickness

More pictures here.

Tags: ,

Apple IIc Compact Serial Console

Posted by mitch on March 05, 2012
hardware

About four and a half years ago, Paul Weinstein wrote up a blog post on setting up a serial console with an Apple IIc. I finally got around to duplicating his efforts this weekend after I got sniped on an eBay auction for a Lantronix serial concentrator.

I’m not going to duplicate Paul’s excellent write-up here, but I will fill in a few areas that I stumbled over.

In order to do this, you’ll need:

  • An Apple II with a serial port. The IIc has two serial ports built-in.
  • At least 3 floppy disks.
  • A serial cable to connect your Apple II to some other computer. I bought my cable and a pack of blank disks from the excellent fellow over at RetroFloppy. You could also make a cable, but in the case of the IIc, I didn’t have any DIN-5 connectors, so it was easier just to buy someone else’s properly-made cable.
  • The Apple Disk Transfer host program and disk image to move to the Apple II. You’ll dump a copy of the Apple II side software onto a floppy disk.
  • The Modem.MGR program disk images, which are available as a .zip file download here. You’ll need two floppy disks to write these onto; one is a configuration tool for the other disk, which contains the application.

I had a lot of issues with higher baud rates; I ended up settling on 9600 baud for most things.

The other gotcha I ran into was forgetting to format floppies with ADT prior to moving the disk image over. It sounds semi-obvious, but two things got in my way. One is that the Apple II reports “I/O error” when reading an unformatted floppy; the scope of what the Apple II considers an I/O error and what I consider an I/O error are different. Also, when this happens, the Apple II disk drive makes a horrible noise that “sounds like” a serious I/O error. So, when ADT starts up on the Apple II, be sure to configure the settings you want (baud rate) and format yourself some floppies. Both of these are in the “splash screen” when the program launches.

I pushed all the Apple II images over with the ADT Pro program on my Mac and a Keyspan serial adapter. Paul’s post mentions using A2V2 that comes with Virtual ][. I could never get A2V2 to work but I was successful with ADT.

Moving a floppy disk image (143K) takes a few minutes at 9600 baud.

I am using the Apple II with my new network management box. I currently have an old Athlon with 1gb of RAM doing this today, and I want to get rid of both the physical and electrical footprint of that machine. One of my previous companies I started was building network security hardware and we built prototypes using boards from PCEngines, among others. The new system I am using for my network manager is a newer board from PCEngines called the Alix2d13. It has 256 MB of RAM, a header for a second serial port (which I plan to add for X10 control), and I’ve added a 16 GB CF card to mine. I’m running Ubuntu 10 on it, which is a happy change from the bad old days of setting up an environment (we were using OpenWRT buildroot… it’s not bad, but it’s a pain when using uclibc, because you’ll need a cross compile environment. Having the space and RAM for the full glibc, python, etc. is wonderful). But this is a topic for another post!

There are more pictures here.

By the way, though I knew how to get around them, there are at least two other small things that might frustrate folks trying to do this themselves. One was that I had to manually start the getty on the Linux machine (something like /sbin/getty -8 9600 -L ttyS0 gets you there). However, it seems that the getty is properly restarting from init scripts on reboot, so I’m not sure why the getty had gone away the first time. The other is that a TERM=linux in your environment with Modem.MGR will mess up a lot of paging apps, such as top or lynx. You can fix this with export TERM=vt100 or similar.

Tags: , ,

Mac Pro Dream Wish List (2012)

Posted by mitch on February 28, 2012
hardware

Apple hasn’t updated the Mac Pro for almost 600 days. My 2008 Mac Pro is 1500 days old. I’ve been holding out for a new model; the wait has gotten so long I’ve even pondered whether just buying a second 15″ MBP would be an OK way to go.

Here’s what I’d like in a new Mac Pro offering:

  • New form factor; no taller (wider) than 3U. The case should fit into 3U of rack space, even if it doesn’t come with rack ears.
  • Eight 2.5″ HD bays for internal storage.
  • Nuke the optical drives.
  • Redundant power supplies (two would suffice, as long as the computer can run on one).
  • RAM ceiling increase; at least 128 GB; 256 GB would be better.
  • Four PCIe slots with two double-wide slots.
  • Better video cards; support two 4 GB cards; four displays per card.
  • Two copper 10gigE ports.
  • 16 cores at the high end.

The physical changes are easy: By nuking the optical drives, there is room for 6-8 2.5″ bays (on their side) in front of the power supply. By nuking the 3.5″ carriers, the case can lose about 1.25″, which is enough to drop the height under 19″, which gets rack-friendly. That still leaves the thickness problem–the Mac Pro is currently 8″ wide, but 3U is 5.25″ and 4U is 7″. Perhaps getting to 3U is too aggressive without adding depth to the case–30″ depth would be fine for racks but not as friendly for desktop use.

I really want to see Apple start shipping 10gigE. The price is getting cheaper; switches from NetGear with four 10gigE ports and 20 gigabit ports were around $1,500 last I checked. Apple can help drive the price down rapidly.

Somewhere around $12k nicely equipped (e.g., 8×512 GB SSDs, 96 gb of RAM, 8 cores, one 4 GB video card) would be great. You’ll note I didn’t mention anything about Thunderbolt; I just don’t care about Thunderbolt in a desktop system.

No, I don’t expect Apple to ship this any time soon, but man I’d really like to have this system.

Running low on my 32 GB Mac Pro.

Tags: ,

Laser Printer Musings

Posted by mitch on February 25, 2012
hardware

The first laser printer I bought was a Lexmark Optra E312. This was in 2001 or so; the Lexmark was $400, had USB, and worked with Macs, though I mostly used it with a parallel port connection to a Linux machine with lpd. It had real PostScript. The print quality was amazing, but the paper handling was terrible. It held paper “upright” in the rear of the printer, which I suppose was a decision of economics, but it also meant that it printed crooked most of the time. It would also jam when making the turn into the “upright” output tray, so the solution was to open the front and let papers fly around on the desk. Despite these issues, I was content with it (for the price) and used it very heavily. I gave it to a friend in 2005 and I believe he still uses it.

In 2005, I bought a new Lexmark network laser printer. It was very cheap, around $250, and it was amazing. I used it very heavily. When I switched coasts for my permanent residence in 2007, I gave it to another friend who is also still using it.

My Canon MF4690 in its natural habitat.

So after this, I needed a new printer. I ended up buying a Canon multi-function laser for around $400. Copying and faxing were important to me and I didn’t have room for 2 or 3 devices (I previously had a separate fax machine). By now, LCD monitors had gotten very cheap and I had a lot of them. I was actually printing far less than I ever had before because I could see so much more on the screen at the same time. I often printed to see more content concurrently, whether the content was code, documentation, or presentations. In fact, I’ve only printed about 4800 pages on this printer in the last 4.5 years.

The multi-function has been amazing. I can scan documents to PDF that the printer emails to me, with no computer involvement. With the auto-document feeder, I can scan in a stack of documents. When doing complex financial transactions, this has been a huge timesaver. No one should be running any kind of operation without one of these devices if you have to sign a lot of documents. Previously I was running to Kinko’s for big “signage” or messing around with a flatbed scanner or dealing with a crappy fax machine. All of those were a huge waste of time.

The downside of the Canon multi-function has been the print quality. It’s somewhere between “mediocre” and “fair.” Gray halftones are a disaster and the definition around the edges is sloppy. While it’s fine for proofreading or marking up a document, it’s embarrassing to hand someone a document from that printer in a professional setting.

Canon MF4690 text output. Note the jaggy edges. Palatino 10 pt font.

In 2009, I needed to print some confidential color documents, so printing them at Kinko’s was out of the question. I bought a color laser printer to augment the Canon, a Lexmark C543DN. As my review on Amazon says, “I liked it. I printed 60 pages. Then it died.” Cause of death was a “service printhead” error. Unfortunately by the time I realized it was dead, it was out of warranty (I did my initial printing, then did 12 months of traveling, then tried to print again). I ended up having 1-800-Got-Junk throw it away with some other trash.

I was wary to buy another color laser printer, but once again I need to create camera-ready documents without hauling myself over to Kinko’s. So I just picked up a Brother color laser printer for cheap on Amazon (and I later added the 2nd paper tray option). Common complaints about the Brother are paper curling and expensive toner–nothing unusual here. The print quality for “business graphics” and text is amazing. I should have bought a new color laser printer when the Lexmark died.

Brother HL4570CDW text output. Much smoother. Taken with the same lighting, microscope, and focus as the previous picture.

The new color printer is quite a bit slower than the Canon when waking from sleep. I printed the above text pages for comparison at the same time from the same computer. The Canon woke up, printed, and was done before the Brother had finished waking up. The Canon has 32 MB of RAM vs the Brother’s 128 MB (upgradable to 384 MB for $10; DIMM ordered). The Brother is also quite a bit louder than the Canon, but quieter than some other printers. To me, these negatives are worth the improved text, grayscale, and addition of color output. Even printing photos on plain 22 lb paper is shockingly good with the Brother; if memory serves, much better than the old Lexmark. Of course, photos will have the halftone pattern and lose a lot of crispness; if you are shopping for a photo printer, laser is probably not the technology you seek. I would love to have a 8-cartridge wide-format printer for such projects.

Toner is pretty well priced for both of these printers; the 1,500-2,500 page toner cartridges for the Brother are $200 for a set of four and the higher yield 3,500-6,000 are $340. The Canon black cartridge has usually run me about $75. These prices are similar to what I’ve paid for other printers. There are a lot of complaints on Amazon about these prices, but I think they are pretty standard and I really appreciate Brother offering the lower yield cartridges as an option. Plenty of other vendors have cartridges running at $120/each. The reality of a color printer is that the printer needs 4 cartridges.

It is amazing how cheap laser printers have gotten. According to this inflation calculator, the $7,000 LaserWriter IINTX printer my dad bought in 1988 would be over $12,500 today. My dad ran 80,000 pages through that printer over the course of 15 or 16 years. I seem to recall reading an article in Macworld about personal laser printers sometime around 1992; the costs were dropping down to $1,500 or so. Today, a pretty good black-and-white laser is $200 and color isn’t much more than that.

In addition to (or because of) high prices, in the “good ole days” of laser printers, Macworld and other magazines would publish enlarged views of actual print quality. I miss that dearly when researching printer purchases.

I am not sure I will get 15 years of service out of my Canon, but I have gotten 5 years so far and can imagine 8 or 10 are quite probable. Even though prices have gone through the floor, there are still quality products out there to be found. I am hopeful the new Brother printer is one of them. The amount of printing I am doing these days is significantly less than what I used to do, but printing is a key part of certain workflows. I suspect that will continue for some number of years to come.

Tags:

Designing a Proper Enterprise IT Appliance

Posted by mitch on February 16, 2012
hardware, software

Colleagues who have worked with me in the last ten years know I have some religion about appliances. To a large degree, I believe that most enterprise software that is installed in a customer’s data center should be packaged as an appliance. The embodiment of this could be as a physical appliance or as a virtual software appliance, but either way, it’s an appliance.

My sense is that appliances, especially virtual appliances, are picking up momentum. We’re seeing more and more software companies offering virtual appliances on the market today and more products that could be packaged as software instead packaged as a hardware offering.

There’s a problem though.

Most of these appliances are crap.

What is an Appliance?
It would be cliché to turn to Merriam Webster for a definition, so let’s consider what the Oxford American Dictionary says an appliance is:

ap-pli-ance n. 1 a device or piece of equipment designed to perform a specific task

So if we’re building an enterprise IT appliance, it’s going to be a virtual machine or a physical machine to perform a specific task.

In my mind I’ve always given Dave Hitz, co-founder of NetApp, credit for defining an appliance, but in this interview [PDF], he gives credit to the model Cisco established:

Hitz: […] We were modeling ourselves after Cisco. If you look before Cisco, people used general purpose computers, UNIX workstations, Sun workstations for their routers. Cisco came along and built a box that was just for routing. It did less than a general purpose computer and so the conversation we kept having with the VCs, they would say, “So your box does more than a general purpose computer so it’s better?” And we’d say, “No, no, it does less.” And they’d go, “Well, why would I pay you money to start a company that does less?” And we said, “No, no, it’s focused. It’ll do it better.”

He continues:

The other analogy that we used was a toaster. If you want to make toast, you could go put in on your burner, you can put it in the oven and it’s certainly the case an oven’s a lot more of a general purpose tool than a toaster. A toaster? What good’s a toaster? All it does is make toast. But, man, if you want toast, a toaster really does a good job, you know? Try making toast in your oven and you’ll discover how awesome a toaster is. And that really, for storage over the network, it was that idea of making a device to do just that one thing, focused. Not run programs, not do spreadsheets, not be a tool for programmers, just store the data.

I’ve always stuck by the toaster model when thinking about appliances for customers.

So what does this mean for the user?
Let’s talk about product requirements.

When a vendor ships an appliance to the customer, everything is included: The OS, the management tools, and the application. The beauty of this approach is that the customer no longer has to install software. The customer is no longer responsible for dealing with OS patching and ensuring the right OS patches are installed that match with the requirements of the application.

The user interface should be stripped down and minimal. The user should never see a general purpose bash shell prompt. The appliance should be as self-contained as reasonable. Configuration should be as minimal as possible. IP address and related information, LDAP or user set-up, NTP and timezone, email and SNMP, application-specific coordinates, and that’s it! This can be implemented in a small X11 set-up GUI (Nasuni does an excellent job here) or a simple ncurses-based text wizard (similar to what ESXi has).

The user should never be told to edit files off in /etc or manually tweak key-value pairs to get the basic application up and running. Some application programmers get off on connecting to a customer-provided database. In a particularly large installation, this might make sense. To store 500 rows of data, it does not.

An appliance is likely Linux-based these days, as it should be. Software updates should come from an update server provided by the vendor. From the user’s perspective, there is no apt-get or yum details to worry about; it’s a simple matter of clicking a ‘Upgrade’ button. Anyone shipping a Windows-based appliance should only do so for very specific reasons (e.g., need access to Windows APIs).

The GUI for the appliance should be web-based. These days, it needs to be accessible from a variety of browsers. Product managers need to understand the average IT guy has more things to worry about than a single product, and hints need to be provided on how to find the management UI for the appliance. I love how HP handles this on their switches and I adopted their model at my last company: Every login console tty included the IP address and how to find the GUI; both shell and GUI login screens included the default account name and password, right there. The last time you installed a home router, did you have to fire up Google and search for the default user name and password? Or did you read the documentation? Did you read the documentation for Tetris? Why should the default user name and password be harder than playing Tetris?

DHCP should be the default on a first boot, and active on all interfaces with a link. Anyone shipping an appliance without DHCP in this day and age needs to get with the times.

Any CLI should be succinct and hierarchical. Enterprise IT gets tricky, no matter how we simplify it, and users need a way to drill into the available commands. The CLI needs to balance “learning” with speed of use. The reality is, most IT folks are using a lot of different products throughout the day. Make yours the one that is easiest for the admin to jog his mind on how to see replication status (or whatever).

When it comes to lights-out management, product managers and engineers must understand that the product is not the center of the end-user’s universe. Problems and reports should be available via email. With a generated email, the subject line is critical and should be succinct but descriptive. “2 alerts (product name)” with a From: field of the hostname is a good start at a subject line. Failures and recovery from failures should be as automatic as possible. Customers should never have to login to click something in a GUI that the product could have run itself to recover from an error.

Although not strictly appliance-related, let’s also talk about sockets and ports of the TCP/IP variety. When it comes to networking, products should be designed with WANs, VLANs, routers, closed ports, and different views of networks when communicating with other instances of the same product. Don’t rely on ICMP pings being available. Don’t rely on your connection target matching the listening target coordinates. Have flexibility. Design your network protocols for the simplest firewall configurations. In a spoke/hub topology, all the spokes should reach into the hub–that is, all spokes open sockets on a port the hub is listening on, even if the logical client/server is the other direction.

Shipping a Virtual Appliance
This is where I see the most sin in the market today. So many folks install Ubuntu, install their software, shutdown the VM, zip it up, ftp it over to their web site and call it a “virtual appliance”. This is a VMDK full of crap. /root/.bash_history is still populated, as are DHCP cache files, log files, and other things that should be scrubbed. There is no OVF installer file. Old snapshots of the VM are included. What kind of embarrassing stuff is in there?

Let me state up front that OVF is one of the dumbest things in the VMware world. There is no need for it to exist; everything that it does could have been accomplished much more simply. But VMware doesn’t like to make things easy, so we’re stuck with it. On the bright side, the user experience of installing an OVF appliance into a VMware environment is awesome. Thus, vendors need to use it.

From a mindset perspective, the vendor needs to get into a mental mode of a manufacturing process to scrub the VM prior to OVF packaging. Things need to be set to “factory defaults”.

With both physical and virtual appliances, the size of Linux distribution should be minimal. This is more important with the virtual appliance distribution, since customers will be downloading it. As a vendor, you can pick a few approaches on how you do this, but in general, reduce the number of packages you’re including to the bare minimum. You need to tune your CPUs and RAM to the minimum required for your application and let customers tune up from there. If you’re shipping both virtual and physical appliances, you need to understand these are different beasts. How will you sell them? My bet is that you’re pushing virtual appliances into remote-office/branch-office use cases, so size the requirements for the VM appropriately. Size your VMDKs down to something reasonable or use thin-provisioning. Note that OVFs with thin-provisioning will not work on ESX versions less than 4.1 or 4.5 (I can’t remember exactly which versions are broken for thin-provisioning with OVF).

Shipping a Physical Appliance
Ten years ago, I worked on my first appliance product. One of the problems we had with this physical appliance when we went out in the field was that we needed a screwdriver to get it in the rack. Customers sometimes had to spend 10 minutes searching for tools if they were installing it themselves. We started to include a multi-tip screwdriver with the product in the shipping carton. In 2010, my new company had the opportunity to buy a few systems from the previous company. The screwdriver was still included. If I ever do a physical appliance again, I will include the screwdriver. What’s $10 on a $50,000 system anyway? Don’t forget this is a branding opportunity–put your logo or URL on the handle.

If your system is heavy, ship it on a pallet. If you’re on the border (70-80 lbs), pay attention to the condition that the system packaging is in when it arrives at customer sites and adjust accordingly.

Pick rails that don’t suck and work in 2-post and 4-post racks.

Use fans that are quiet. Spend a bit of time to add software support to control the fans appropriately. If you own a previous product I worked on with loud fans, I apologize. I really do.

There are lots of little details to take care of to finish a solid appliance offering. The application should be monitored by a watchdog (inittab, eventd) so when it goes down, it comes back up. Log file size and rotation should be set up. Cores should be constrained if runaway coring occurs. The application should start when the appliance is booted by default. It sounds obvious, but I’ve seen a few appliances that didn’t do this. Vendors should change /etc/rc.sysinit so that when fsck fails during boot, customers are instructed to call the vendor, or dropped into an emergency shell, rather than prompted for a root password. Vendors need to abstract configuration variables set by the users from their destination /etc files. It needs to be easy for the user to back-up, reset, and re-apply configuration settings.

Where Do We Go From Here?
Lots of applications are going to the cloud, which is fantastic. We’ll continue to see more of that. But we’ll still need to have software in our data centers. And it would be nice to see much of that software shipping as an appliance. I hate installing software applications on an OS for IT workloads. It’s stupid, it’s complex, and it’s largely unnecessary. Anyone who has installed a complex application knows how stupid it can be. Installing a TSM server package on a CentOS base is a quick 200 step process and the fact that even I could make it work means it was probably pretty easy.

Over time, we might find that some of the Cloud APIs are enabling compute resources with a different layer underneath than the traditional OS. A proper API underneath that extends onto physical and service offerings that can help standardize some of these appliance computing characteristics would be wonderful, but I don’t see how anyone can make money developing such a thing, so I am not optimistic that it will come to be.

So, remember, an appliance:

  • Does one thing. It is focused and minimal.
  • Is stripped down. There’s no bash shell for the user. The UI is focused, concise, web-based.
  • Is lights-out. It recovers from failure. It is well behaved. It handles updates easily.
  • Reduces burden on the user.

Vendors need to quit shipping software junk that they call an appliance. Customers need to demand more; it’s amazing how much bad software IT has to deal with. Stop adding to the pile.

Ship something good.

Many thanks to my colleagues and friends who reviewed this post before publishing.

Tags: , , ,

USB Wall Outlets Follow-up

Posted by mitch on February 11, 2012
hardware, home

A few weeks ago I wrote a post about USB wall outlets. On January 25th, I stumbled over the Cooper USB Charger that is a Decora-shaped receptacle. This is exactly what I wanted. Some of the other vendors poo-poo the Cooper for only being a 700mA charger vs 1 or 2 amps, but frankly, the smaller mA rating means the Cooper footprint is smaller. I am also not sure I want a 2 amp charger in a wall box.

Since my use case is to plug things in overnight or for long periods of time, I don’t care how long it takes an iPad or iPhone to charge with this (within a reasonable amount of time). I do, however, care a great deal about the cosmetic looks–which is the whole point of a USB wall outlet, right? If you didn’t care about looks and only cared about charging speed, a big mess would suit you fine. The Cooper has the looks right and the standard Decora form factor means that the Cooper can be installed into multi-gang boxes with other outlets, other Coopers, etc. and it will all fit OK.

Today I installed the Cooper next to the side table on my side of the couch. What a difference it makes in the wire clutter. Before I had a “right angle” adapter to fit in the iPad charger, iPhone charger, and a Mac laptop charger. The clutter is vastly reduced, as you can see from the pictures. I also installed another one of these outlets next to my nightstand for iPad & Kindle charging.

Installation is fairly easy and no different than any other device you might install. One thing to note that is there’s one only set of screw terminals, so if you’re replacing an outlet in the middle of a run, you might find yourself adding pigtails–which is another plus for this device having a smaller physical footprint than the competition. If the previous sentence didn’t make sense, you should call your electrician to install this.

I’m very happy with this solution. You “lose” an AC outlet, but if at least one of those outlets was for a USB charger, you are actually losing nothing, and if both outlets had a USB charger, you gain an outlet. The Cooper also looks better than the other options on the market I’ve seen (U-socket, NewerTech, and various wall-plate chargers). Also, despite what some guy on Amazon says, these outlets are UL-listed.

I’ve posted more pictures in this flickr set.

You also might enjoy my post on built-in night lights.

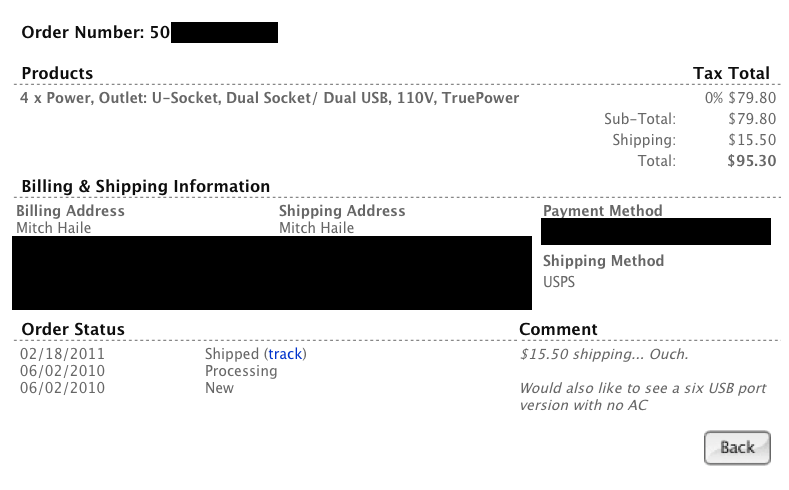
P.S. I had noted in the prior blog post that I had previously bought the U-socket from FastMac–In fact, I spent over $90 on buying four of them, but I never installed them because they are ugly. I think I was so disappointed that I threw them away when I got them. Another big downside was that I ordered them on 6/2/2010 and they were shipped to me on 2/18/2011–that’s 8 months later, with no warning, which if not a violation of credit card rules (30 day pre-order is the limit, right?), certainly was disappointing from a customer service perspective.

Tags: , ,

MacBook Pro 15″ with Upgrades

Posted by mitch on December 20, 2011
hardware

As part of my change in laptops, I bought a MacBook Pro 15″. As I mentioned in my last post, I intend to start traveling with two laptops; the 11″ Air for working in tight spaces, like airplanes, and the 15″ for when I have a table or desk to work at. Not having a more powerful machine with plenty of RAM on the road had been limiting the kinds of tasks I could work on.

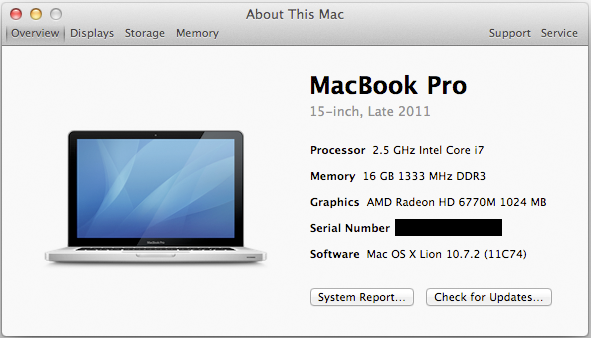
So I bought the 15″ matte MacBook Pro with the high res screen and 1 GB VRAM. Unfortunately, when buying this screen spec at a physical Apple Store, they only have a “top of the line” model with the 2.5 GHz i7 processor and a 7200 rpm drive. However, it is easier to use my corporate discount at physical Apple Stores (my company doesn’t seem to have an EPP online store), so I bought it. By the way, the EPP discount on the MacBook Pro was 8%. I then ordered a 256 GB SSD, optical drive bay adapter bracket, and 16 GB RAM upgrade kit from OWC and installed them:

I had been under the impression that working inside a unibody MacBook Pro was a painful experience, but it’s actually quite simple. The OWC bracket kit comes with some tools but I found the screwdriver to be of dubious quality and used different drivers. All you need is a T-6 torx and a Philips #00 (or perhaps #0, I couldn’t really decide) driver. OWC has some nice videos and it really is quite easy.

The hardest part was dealing with installing Lion on the SSD. The Internet install claimed that there was an error with the SSD drive. I ended up finding the “InstallESD.dmg” from a Lion upgrade I did on my previous Air and running that from the hard disk to install Lion on the SSD.

I am very thankful to all the folks on Twitter who told me 16 GB of RAM was possible in the MacBook Pro. It is fantastic to have such a powerful machine in a laptop and I hope I can adjust to the weight change. If things go well with the MacBook Pro, I expect to swap out the 750 GB hard disk next year with another SSD.

Update March 2012: I just added a 2nd SSD to the MacBook Pro. So far so good!

Tags: ,

Flying with the MacBook Air 11″

Posted by mitch on December 16, 2011
hardware, travel

I recently bought an 11″ MacBook Air for airplane use. In 2011, I did about 44 trips, which means I was on at least one plane about 88 days this year. Those 88 days yielded 140,000 miles of travel, which works out to 1600 miles on average per day of travel. At 500 mph, that’s 3 hrs in the air on 88 days on average, or 264 hours in the air during the whole year.

During that time I concluded that the 13″ MacBook Air is just too big on most coach tray tables, and even some first class tables as well. I don’t always want to work on a plane, but when I do, not having a good laptop solution was reducing my productivity and increasing the number of tasks I would have to do after or before landing.

I don’t view the 11″ as a replacement laptop, but rather a secondary laptop. While it probably is ridiculous to carry two laptops, they have gotten a lot lighter and so far, I feel it’s worth the weight increase–the 11″ is about a pound heavier than the iPad and about the same size. I might change my mind in 100,000 miles, though.

The 11″ MacBook Air fits surprisingly well on the newer A321 first class tray tables (the ones that are about 6″ deep). I think it might have been designed for this table, in fact–the fit is just that good. I also did a leg today in 9E in coach (exit row with no right seat on a A319 aircraft) and it’s a fine fit there as well. Row 8 didn’t recline, but I still had a good inch behind the screen and could 2″ to spare with a little less comfort.

I was worried about the 1280×800 resolution. When I moved from the 2008 MacBook Air 13″ to the 2010 model, I thought the 1440×900 vs the old 1280×800 made a huge difference. But looking at the two 11″ and 13″ side-by-side, I don’t think I care about the loss of pixels, especially given the upside of reduced size.

There is a hidden cost of using two laptops if you have a desktop as well–applications like Photoshop and Office are often licensed for use on two computers, not three. So I have to buy another copy of Office, but I plan to forgo the Adobe applications.

The upside of two laptops is very handy, though. It’s nice to have two screens on the road. I was at a coffee shop Thursday morning preparing some notes for a meeting. I had a slide deck open on one screen that I was reading and creating summary slides on the other. DropBox syncing makes moving files between laptops easy, and with my MiFi, a WiFi LAN is easy to enable (DropBox will sync over a local LAN if peers are found on the LAN). Of course, there’s other ways to setup a WiFi LAN with two machines without a MiFi.

I wrote this post and some other things while on a flight from SFO to PHX. During the 400 miles from SFO down to southern California before hanging a left to Phoenix, I wrote over 1,200 words and was comfortable doing it. Even though I was sitting in first class, I would not have been nearly as comfortable doing this with the 13″ model. On my later leg, I wrote some code I had been meaning to work on for months but hadn’t had the time. I don’t think I’ve written code on a plane in years. I ended up creating perhaps 15-20 pages of content while in the air today, even though 70% of that time was in coach. Pretty good! Battery life was pretty decent too; if I had worked straight though I might have run out of gas by the end of flying, and I started around 85% on my first flight. I’d say the 11″ can barely make it across the US at the lowest screen setting with one or two small low-CPU apps open.

Is the MacBook Air 11″ a good buy? I think so. With my 6% corporate discount and CA sales tax, the laptop ended up being $1226 (I bought the middle $1199 model). It’s a heck of a lot of computer for $1226. Going back to the earlier math, I only need a billable rate of $4/hr to break even on the $1226 purchase. Fortunately, my billable rate is a little higher, so I should be in the black pretty quickly.

Tags: ,

Fun with Mac Pro SSD Performance vs SAS vs eSATA

Posted by mitch on November 19, 2011
hardware

This week I finally got around to biting the bullet and buying a 250 GB SSD for my Mac Pro. I’ve been using MacBook Airs with SSDs for a few years now, but since I had a fast SAS RAID array on my Mac Pro, I had been pretty content to live without one in the Mac Pro. My Mac Pro is almost 4 years old and really starting to show its age. I’ve been hoping to keep it limping along until the next revision.

So with mild expectations, I bought an SSD from OWC (and a NewerTech 3.5″/2.5″ bracket from Amazon, shown in the picture above) and configured it as the boot/applications drive. I did a fresh install of Snow Leopard onto the SSD, updated it, and migrated over my applications. Using the ‘Advanced Options’ by right-clicking my account in the System Prefs > Accounts panel, I pointed my user account at my old home folder on the SAS RAID. Everything was good but a few things didn’t work as expected:

1. DropBox seems to have hard-coded /Users/<name>/Dropbox for its path. But my home directory is now /Volumes/sas-raid/Users/mitch. I wonder what else has the home directory hard-coded.
2. I forgot to change my boot arguments to boot 64-bit after reinstalling Snow Leopard, which caused some confusions for Adobe applications, Drobo, and others until I remembered to change that. (Note: This has nothing to do with the SSD, but rather that I was using 64-bit prior because I have 32 GB of RAM.)

Results
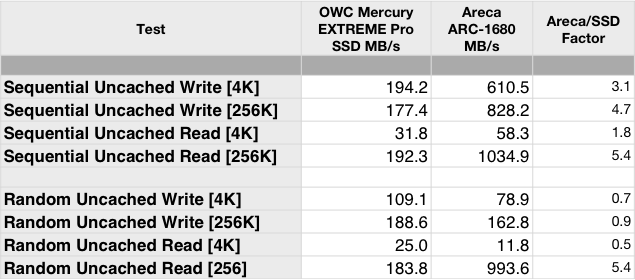
So what are the results? The raw benchmarks show that the SSD is about 2x faster for small, random 4K reads, a little faster for small, random 4K writes, and much slower for everything else:

So the SSD performs slower than the RAID for everything sequential, which is not surprising. (If you’re wondering why these results are lower than some SSD numbers you might have seen, bear in mind the 2008 Mac Pro has a slower SATA interface than the modern stuff.) However, the SSD is faster–in fact, twice as fast for small random reads! This is rather remarkable–the SSD runs about $400 and the RAID setup is about $2,000 (though with 32x the physical capacity).

The “real world” results in terms of how the computer feels is fantastic. All the usual speed you’ve heard about SSDs was true for me too–faster OS boot, faster login, faster app launches. I have a Windows 7 Pro VM for Outlook and a Linux development VM, both of which I tucked onto the SSD and resume/suspend is very fast–and best of all, VM operations don’t interfere with other operations on the computer. I will probably add a second SSD for these two VMs shortly.

Other Benchmarks
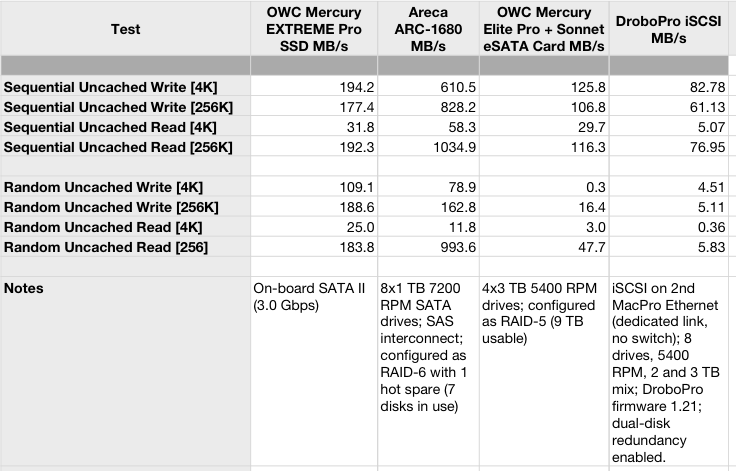
Since I was doing benchmarking anyway, I also compared my external eSATA 4 disk RAID and the DroboPro connected via iSCSI. The eSATA results are quite good for the price ($50 for the Sonnet Temp E2P card and you can put together an array with similar performance for $600). As expected, the Drobo is quite a bit slower (although sequential I/O is decent), but no one buys a Drobo for performance anyway:

Most striking here is the 300x difference between the small random writes on the eSATA RAID and the SSD! I believe this RAID is waiting for data to be on disk (vs the disk cache) and perhaps the other RAID examples are not (Areca is pretty clear on requiring a UPS for data integrity). And of course, we see an 8x favor for the SSD for small random reads. For the cost, I really like the performance of this RAID unit and plan to buy another of these with 7200 RPM drives. The Sonnet eSATA card I am using is SATA I and II; upgrading to the Sonnet Tempo 6Gb card probably won’t open up the performance of this RAID further (which OWC says is 3.0Gbps = SATA II).

What should you conclude? Certainly what makes sense for your work is likely different than mine. But you’re still going to have an OS and applications and the SSD random I/O performance makes that quick. What else you augment the SSD with may vary, but I think at this point, any and every power user is going to see benefit from investing in one or more SSDs.

All the benchmarks were performed with XBench 2.1. I ran them a few times and eyeballed that the results were relatively consistent. I didn’t do any averaging. The computer was otherwise relatively idle, with regards to both CPU and I/O. An obvious benchmark that is missing here is comparing the speed of a single SATA internal disk. I just don’t have any bare drives in my Mac Pro to test at this time.

Tags: , , , , ,